Second Flow Motion Sock -- now with markers!
I'm making progress on my second Flow Motion sock. The second one is going to fit better, I think -- my half-baked plan, rather than re-knitting the heel, instep and leg of the first sock, is to try wearing it on my left foot (which is a tad smaller), and the second sock on the right. Must mark them somehow. If all else fails, well, if I have to re-knit it, now I can use these fab stitch markers I made: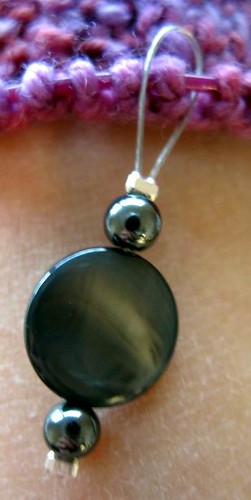

Stitch marker in action!
This was a very inexpensive project and a lot of fun. I used this tutorial and this one. Apparently the "tiger tail" referred to in David Reidy's tute is the same as the more generic "nylon coated beading wire" referred to in the other tute. JoAnn's had "Beadalon" brand "bead stringing wire", and that is what I used. Bead wire, some crimp beads, hematite beads and shell (?) beads, all very inexpensive at Michael's and JoAnn's, and very simple to put together. Here it is in a nutshell -- cut some bead wire, double it, put on a crimp bead, put on decorative beads, put on another crimp bead, use pliers to crimp the crimp beads, trim ends, and voila.
I like having no jump rings (which can catch on the yarn) and I like that the bead wire is so thin, so no gapping is created by the marker. The weight of these is nice, they hang nicely without flopping around and are not in the way. And if you are like David Reidy and into binary code, you can make bead markers with messages!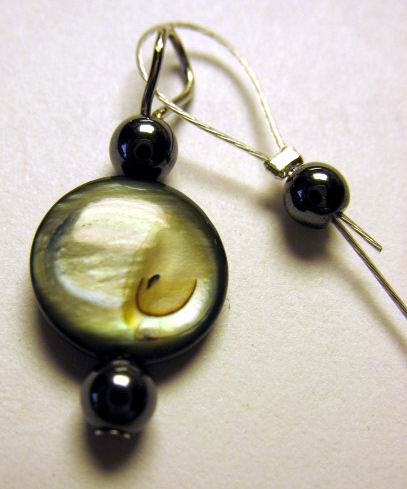
This one was a little more complex. I was trying to combine the bead-wire type stitch marker with the idea from this tute. The idea was to have a two-row row counter (what?! sometimes I have trouble counting to two). 
The top part was double-ended, with a loop at each end for the knitting needle, and only 3 small beads. The bottom, intact part, is made with a head pin and some beads. It was harder than I thought to make the loop at the top. Yes, I am a klutz.
The general idea is that as you're going along making toe increases / decreases or gusset increases / decreases, when you get to this marker you slip it by putting your right-hand needle into the other loop, not the one your left needle is in. This should make it easier even for me to keep track of whether I'm on an increase / decrease row, or a plain row. OK, I should be able to read my knitting and not need a row counter, but sometimes I mess it up anyway. Plus I just like this idea.
The problem, I think, was that one of the crimp beads broke for some reason. Must try again. If it works, I can make row counter markers for various projects, with the number of rows for the pattern repeat reflected in the stitch marker. Whee!
ETA: I don't know why I didn't just fix that broker marker before posting, because it took all of about 10 seconds.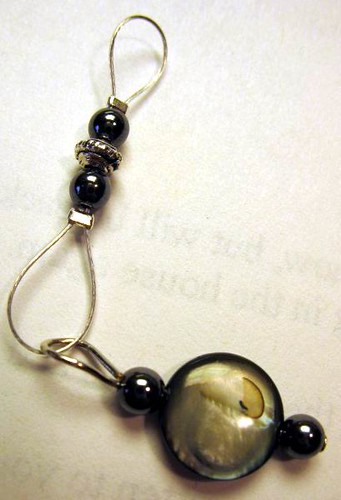
ETA - there is now an updated link above to the row counter tutorial.
posted by AuntieAnn at
11:03 AM
![]()
![]()
9 Comments:
Very nice!
That's a great idea for markers.
By Cookie, at Wednesday, January 23, 2008 12:48:00 PM
Beautiful Stitch markers!!
Check my blog out...you just received an award!!
By hakucho, at Wednesday, January 23, 2008 1:29:00 PM
Your stitch markers are so pretty! Thanks for sharing to tutorial, I'd never seen them done that way before.
By Lindy, at Wednesday, January 23, 2008 2:47:00 PM
Thanks for linking to us. I hope you enjoy the site and come back often.
You raise an interesting question, can you make some sort of row counter that would be light enough to use as a stitch marker....
Hmmm. I think I know a way.
By A Jackson, at Wednesday, January 23, 2008 4:09:00 PM
Very cool. I like those markers a lot. Almost makes me want to make some, too.
By Anonymous, at Wednesday, January 23, 2008 4:34:00 PM
I love the stitch markers!
By Anonymous, at Wednesday, January 23, 2008 6:16:00 PM
Like your stitch markers! That every other row counter is a good idea...I always have to take extra time to figure out where I am.
Ang
By Anonymous, at Thursday, January 24, 2008 6:19:00 AM
Cute stitch markers. They look great on your flow motion sock too. I hope you will post more about your mods.
By Anonymous, at Thursday, January 24, 2008 9:11:00 AM
Very nice stitch markers! Those look much easier to use than the jump ring ones, and I love the big beads.
By Liz, at Thursday, January 24, 2008 10:46:00 AM
Post a Comment
<< Home