How to Knit a Single-strand Flow Motion Sock
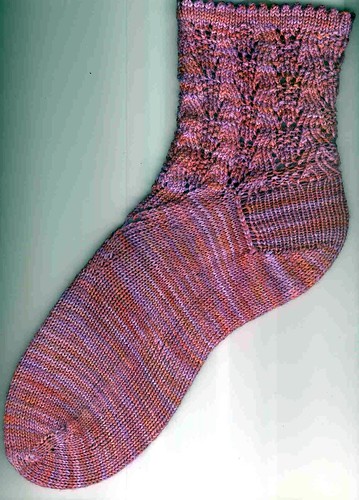
At last, I have a decent portrait with a blocker and everything.
Maia suggested I should write up my mods for the single-stranded Flow Motion socks, and I am incredibly flattered by this. Maia is a fiber goddess, being spinner / dyer / knitter / designer and possibly weaver (have I missed anything, Maia?) all in one. Me, I just knit.
Since flattery of this type will clearly motivate me, I will now explain my mods. If you do not happen to be interested in knitting a single-strand Flow Motion Sock, you might want to just look at the pic and skip the numbers-blah-adding-blah-charts-blah-blah-blah below. I won't be offended.
First of all, the original pattern by Cat Bordhi (to be found in Vogue Knitting's Ultimate Sock Book as well as in Vogue Knitting, Fall '06 I believe) is written to be knit with two strands of yarn (Trekking sock yarn is the recommended yarn) held together and knit on size 6 (4mm) needles. Clearly this will result in a thicker sock than if knit with a single strand of yarn in the usual way.
I wanted to knit these socks, but with a single strand. What to do? I was somewhat at a loss until New Pathways for Sock Knitters: Book One came out. The Flow Motion sock is based on the "Upstream" sock architecture in that book.
I used the Upstream Master Pattern and cast on to knit from the toe up, per the instructions (using a pretty ordinary toe instead of one of Cat's), using a 2.25 mm KnitPicks circular needle. My yarn, by the way, is Dream in Color Smooshy sock yarn. The gauge I was getting was 8 SPI. For my 9" foot length and 8" foot circumference, the formula in the book called for me to increase to 56 stitches around and then to knit to 4.33 inches before doing the instep increases.
Now, the chart for the instep increases is 26 rows, increasing from 2 to 33 stitches, meaning it has 31 increases. This was not going to give me enough stitches to match Cat's Master Numbers for me for this sock, and I knew that at the smaller gauge there would not be enough rows to give me the right length. I needed to knit more rows, and to increase from 56 stitches to -- well, there was a little confusion at this point.
The chart would have me increase to 96 stitches, but at the same time said that "the arch expansion total is nearly always equal to the midfoot total plus half the midfoot total", which would give me 84. I went with 93, somewhere in the middle but much closer to the chart number. An even larger number might have worked a bit better -- the socks are a little hard to get on, but they fit alright once on.
So, additional rows and increases needed to be worked to get the midfoot stitch total (56) plus the increases from the chart (31) to the desired stitch count (93). Six additional increased stitches, in fact, in my example.
I can't really explain how I decided how many additional rows to do. Guesswork would probably be the most honest answer. I worked 6 extra rounds (a few more would have been better), increasing two stitches every other row, before beginning the chart. These extra increases began on either side of the center instep stitches, and moved outwards as I went. Place markers on either side of the 2 center instep stitches and increase in the stitch before the first marker and the stitch after the second marker, every other round. I used Cat's LLinc and LRinc increases. YO's would be interesting, too.
ETA: I realize now that's not how I actually did it. It would work, with increases spreading out of the two center stitches. What I did, though, to echo the "V" of the instep chart, was make a right-leaning increase in the first stitch after the first marker, and a left-leaning increase in the stitch before the second marker. That way, the markers keep moving outward as you make the increases.
After the last plain round I began the instep chart. Move the two markers back to either side of the center two instep stitches, and then begin.
Once my instep chart was done, I worked a plain heel using Cat's instructions, decreasing per the toe-up heel decreases until I had 64 stitches. The leg chart is 16 stitches across and the original pattern calls for 3 repeats around the leg (48 stitches around the leg). Four repeats and 64 stitches around were appropriate for this size sock in this gauge.
I have two important tips for you here --
The first is that there is an error in the leg chart (the written instructions for the leg pattern are correct as written). In row 5, stitch 10 is shown in the chart as a plain knit stitch, but it should be a YO.
The second is -- where do you start the leg chart? The instructions only make sense if you are knitting the original pattern.
After careful reading and scratching my head and thinking about where the beginning of the chart would have fallen if I were knitting the original pattern, I came up with the answer.
You begin the leg chart on top of the 5th stitch of the last row of the instep chart.
That's a pretty bland statement there, isn't it? But at the time it seemed like a major breakthrough.
Knit (plain knit stitches in the plain ones, KBL if the stitch below is KBL) until you have knit the 4th stitch of the last row of the instep chart, then place a marker and begin the first repeat of the leg chart.
I changed to a 2.5 mm needle when I began the leg, since the instep and heel were a little tight -- I sure didn't want the lower leg to be so tight I wouldn't be able to get the socks on.
And now you're home free, nearly. Work the leg chart four times around, four times, do the top edging of your choice (I chose a plain picot edge instead of the seed stitch picot edge in the pattern), et voila.
And in the timeless tradition of completely pointless instructions everywhere, let me add: Make second sock.
Other pics of my socks in my previous posts are here.
Questions? Bouquets? Rotten tomatoes? Let me know.
posted by AuntieAnn at
8:04 PM
![]()
![]()
6 Comments:
Thanks for posting these, I like the way you explain things. And they look very pretty!
By Liz, at Thursday, February 14, 2008 8:30:00 AM
I'm so glad Maia prodded you. I would have if I'd had the energy. Thank you so much for posting this! I love the way yours turned out and want to make a pair for myself sometime. Of course, naturally, the Fall 2006 Vogue Knitting magazine would be the only one from the last two+ years that isn't in the magazine box on the bookshelf. If I can't find it I may have to buy the book just to be able to make those socks.
By Ronni, at Thursday, February 14, 2008 10:43:00 AM
Thanks for the details. I have this sock on my list but hesitating knitting it as I don't like to thicker yarn. Your socks look great.
By Ann, at Thursday, February 14, 2008 2:40:00 PM
Thanks for posting the mods...I (like you) would much rather a thinner sock :) Nice work...happy knitting ;)
By hakucho, at Friday, February 15, 2008 2:46:00 PM
Ann, you are making me blush!
The next time I have a spare moment, I am so going to try your mods.
By Anonymous, at Friday, February 22, 2008 8:13:00 PM
They are just amazing.....
By Anonymous, at Friday, March 21, 2008 3:20:00 AM
Post a Comment
<< Home